Brevo is a popular SMTP relay option for VPS users because it offers a generous free sending allowance and works well with websites, apps, and WordPress installations hosted on a VM6 Networks UK VPS.
Brevo SMTP Details
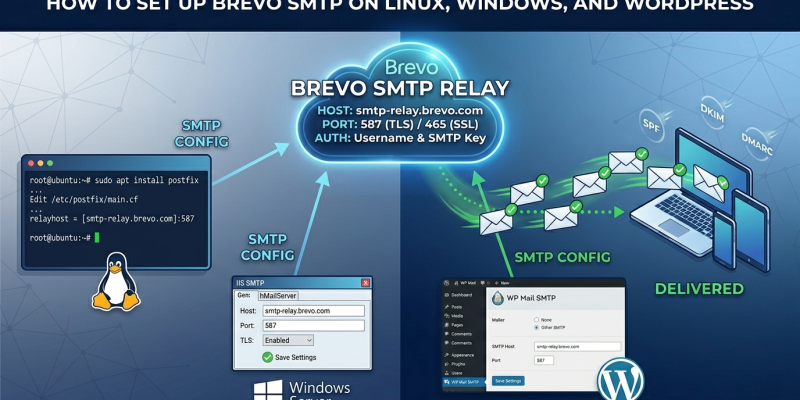
- SMTP host: smtp-relay.brevo.com
- Port: 587 for TLS or 465 for SSL
- Username: Your Brevo SMTP login
- Password: Your Brevo SMTP key
Install Brevo SMTP on Linux
sudo apt update
sudo apt install postfix libsasl2-modules mailutils -y
Edit the Postfix configuration:
sudo nano /etc/postfix/main.cf
Add or update:
relayhost = [smtp-relay.brevo.com]:587
smtp_sasl_auth_enable = yes
smtp_sasl_password_maps = hash:/etc/postfix/sasl_passwd
smtp_sasl_security_options = noanonymous
smtp_tls_security_level = encrypt
smtp_use_tls = yes
Create the SMTP password file:
sudo nano /etc/postfix/sasl_passwd
[smtp-relay.brevo.com]:587 YOUR_BREVO_USERNAME:YOUR_BREVO_SMTP_KEY
sudo postmap /etc/postfix/sasl_passwd
sudo chmod 600 /etc/postfix/sasl_passwd /etc/postfix/sasl_passwd.db
sudo systemctl restart postfix
Install Brevo SMTP on Windows Server
- Install an SMTP-capable application such as hMailServer or configure your application directly.
- Set SMTP host to
smtp-relay.brevo.com. - Use port
587with TLS enabled. - Enter your Brevo SMTP username and SMTP key.
- Send a test email.
Configure Brevo SMTP in WordPress
- Install the WP Mail SMTP plugin.
- Select Other SMTP.
- SMTP host:
smtp-relay.brevo.com - Encryption:
TLS - Port:
587 - Authentication: enabled
- Enter your Brevo SMTP username and SMTP key.
- Save and send a test email.
Final Tip
Add Brevo’s SPF and DKIM records to your DNS zone before sending production email. This helps prevent WordPress emails from landing in spam.